Sfdc Cant See Delete Option for File Uploaded by Another User
Note
Import templates are part of Cloudingo's Rapid Import feature available with a Professional or Enterprise license. Contact your account representative if you wish to employ this feature.
If you repeatedly employ the same file formats for your uploads and the verbal same import options for those file uploads, this characteristic is for you.
Import Templates permit you to configure specialized settings relative to your specific import process then that you can automate that process in futurity import uploads. You can salvage each setting within each import step and build scan rules to tell Cloudingo which filters and automation rules (and car-merge/push options) you want to choose for each scan. Templates greatly reduce the wait fourth dimension in between each scan, allowing the import template and automation task to complete the entire process for you lot.
Once templates are created, all you need to do is upload your file and the processing begins. You tin create multiple templates to handle unlike file format uploads equally well.
Templates are created initially within the Import Template Library and tin be individually owned or shared with other users if you have multi-users enabled in your Cloudingo account. The possessor/admin user of Cloudingo volition automatically have permission to create and share templates. Additional users must accept the Import Template permission enabled for their specific Cloudingo function in order to utilise this characteristic.
Recommendation
It is highly recommended that you lot familiarize yourself with the normal Cloudingo Import Tool process entirely. You should be able to comfortably comprehend and be able to detail your import process steps earlier attempting to set up an import template automation.
Navigation
In that location are two ways to navigate to your Import Template Library.
Access the Import Template Library directly from your User Menu option at the acme, right corner of your main dashboard.

Access the Import Template Library directly from the Import Wizard kickoff page (from your Imports Dashboard) by clicking the 'Manage Import Templates' button to the top right corner.

Both navigation options will bring you into the Import Template Library where you can create a new template, or edit an existing template.
Creating & Managing Import Templates
To create a new Import Template, click Create Template in your Import Template Library.

Steps for creating import templates will vary based on the Salesforce object selected in Stride one. Options are 'Lead', 'Account', 'Contact', and 'Contact then Lead' for multi-object import. Other options include 'Person Account' and 'Person Account then Pb' if person accounts are enabled for your org, and Custom Object selections if you have Custom Objects enabled.
For more than detailed instructions on the options available, cull the object(s) that volition be used for importing. These links volition direct y'all to object-specific instructions. You will fix the settings to match what you would normally choose during your normal import process.
Tab 1: Import Object Settings
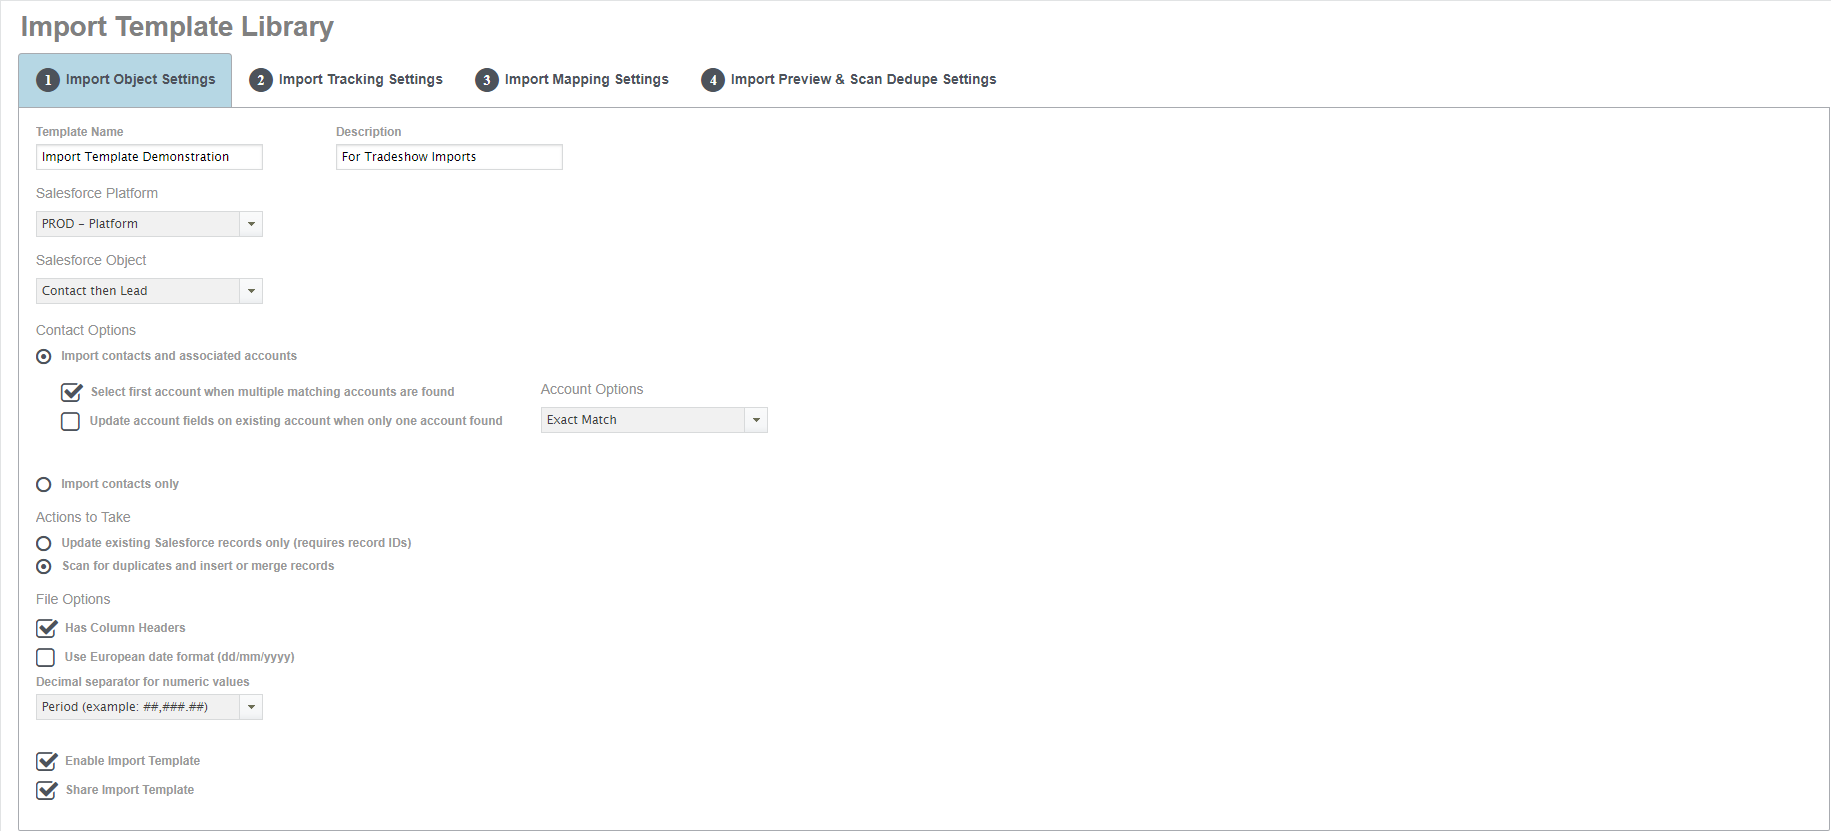 Example used for this commodity is using Contact then Lead (multi-object) import. Options will vary based on object chosen. For more details on options available, please refer to the specific object import help commodity. All settings volition need to be prepare the same manner you would set them during your normal import procedure.
Template Name
Name your Import
Description
Give a description for your template
Salesforce Platform
Choose the Salesforce platform connection that y'all wish to create the template for (ex: Production connection vs. Sandbox)
Salesforce Object
Cull the Salesforce object(s) that yous will be importing against.
Actions to Have
(Options will vary depending on Salesforce object chosen ) – Please run across specific import object links for more assistance. Cull the setting you lot would normally cull during your regular import procedure.
File Options
Choose your file choice settings for Column Headers, Date Formatting, and Decimal separator for numeric values (if using non-US date or decimal format as your default).
Enable Import Template
Templates are simply bachelor if enabled.
Share Import Template
Allows the template to be shared with additional users if you take multi-user logins enabled in Cloudingo.
Click Continueto motion to Tab 2.
Tab two: Import Tracking Settings
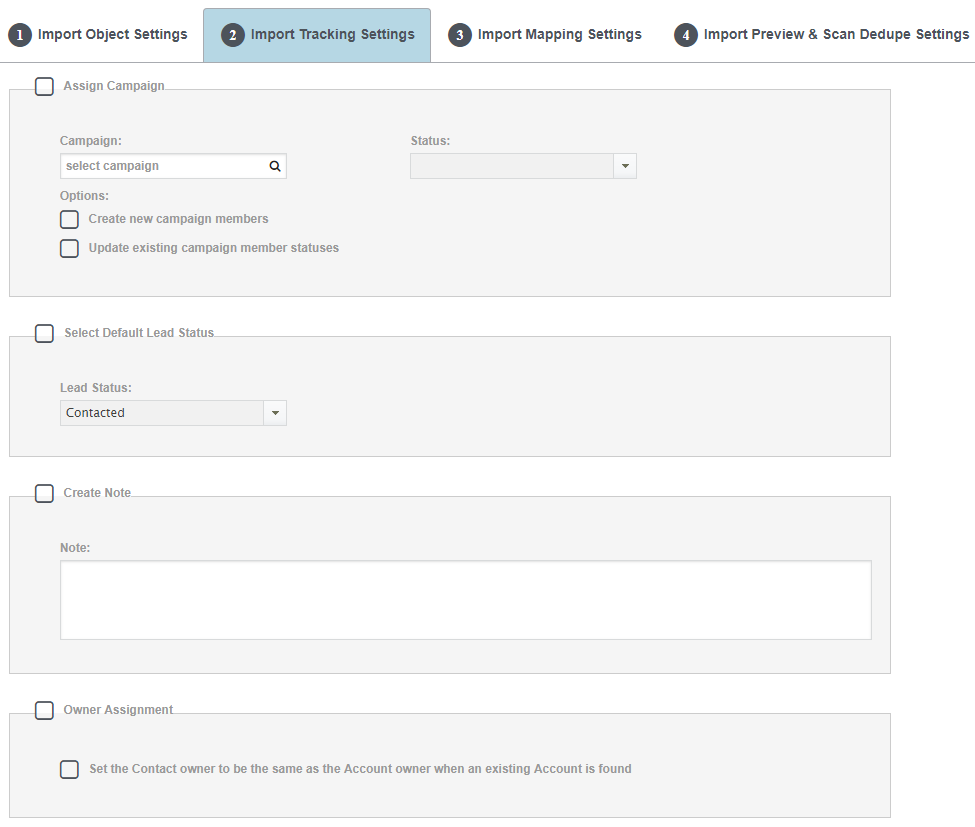 Instance used for this article is using Contact then Lead (multi-object) import. Options will vary based on object called. For more details on options available, delight refer to the specific object import aid article. All settings will need to be prepare the same way y'all would set them during your normal import procedure.
Assign Campaign
Choose Entrada, Status, Create/Update options as applicable.
Notation
If assigning a campaign in a template for re-employ in future imports, yous will need to edit your existing template to update the campaign for futurity campaign imports.
Select Default Lead Condition
Choose your default lead condition (if applicative and if unlike than your Salesforce default status).
Create Note
Choose to generate a new Note on all merged or imported records.
Owner Assignment
Choose option to set Contact possessor to be the same equally Account owner when existing Account found (if applicable).
Choose Continue at the lesser, right of the folio to move to Tab 3.
Tab iii: Import Mapping Settings
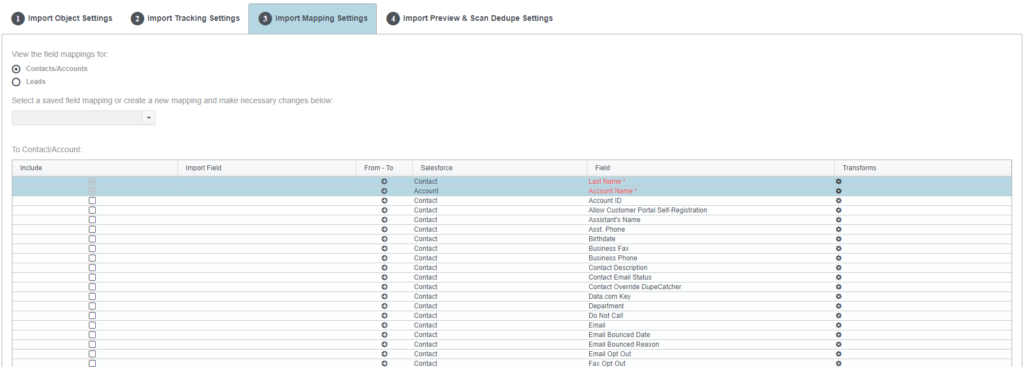 Example used for this article is using Contact then Pb (multi-object) import. Options volition vary based on object chosen. For more details on options available, please refer to the specific object import assistance article. All settings will need to be set the aforementioned way you would fix them during your normal import process. Map all relevant fields and objects for the file format that you volition exist using with your template. Mappings you have saved during a normal import process will exist available in the saved mapping options. It is recommended that y'all pace through a normal import commencement and salve your mapping for selection in your template mapping.
Click Go alongto move to Tab iv.
Tab 4: Import Preview & Scan Dedupe Settings
This step combines your scanning and rescanning options during Steps five and half-dozen from the normal import process into an automated setting configuration.
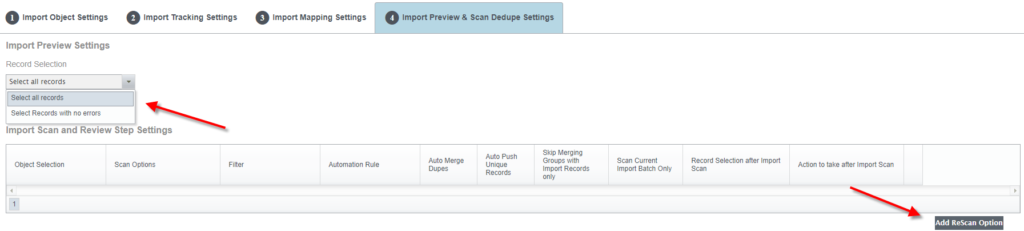
Record Selection
Cull 'Select all records' or 'Select Records with no errors' to select which records to scan. Records with errors at this stage will accept validation errors (potential issues establish in the data or formatting of your file). Records with errors will be viewable in the Import Wizard after the template automation is complete. You lot tin can choose to bypass those records during scan or keep the process with those records. This option is the same equally doing a 'Select All' in Step 6 for scan or filtering out only records without errors during Step half-dozen.
Begin Steps
Click the 'Add ReScan Option' to configuring scanning/rescanning settings.
Import Scan and Review Step Settings
Scan settings run in the society that they are configured in this section. Each step is defined in a new scan iteration (row) in your settings. Example is provided below.
Object Selection
Cull which object you want to scan (yous will see options available if doing a multi-object import).
Scan Options
Choose the selection that y'all would typically choose during Stride five for each browse/rescan iteration yous are configuring.
- Scan for Duplicates
- Do nothing and let me manually determine what to push button to Salesforce
- Don't Scan for Duplicates; but button all records automatically
Filter
Choose the filter that you would typically cull during Step 5 for each browse/rescan iteration you are configuring.
Automation Rule
Choose the automation dominion that you would typically choose during Stride 5 for each browse/rescan iteration y'all are configuring.
Car Merge Dupes
Cull the option that yous would typically choose during Footstep 5 for each scan/rescan iteration you are configuring.
Motorcar Push Unique Records
Choose the selection that you would typically choose during Step 5 for each scan/rescan iteration y'all are configuring.
Note
For multi-object Contact then Lead import, when configuring a rescan option for 'Contact', this setting is equivalent to the 'Push button Contacts instead of Leads when Matching Account is plant' in Pace 5.
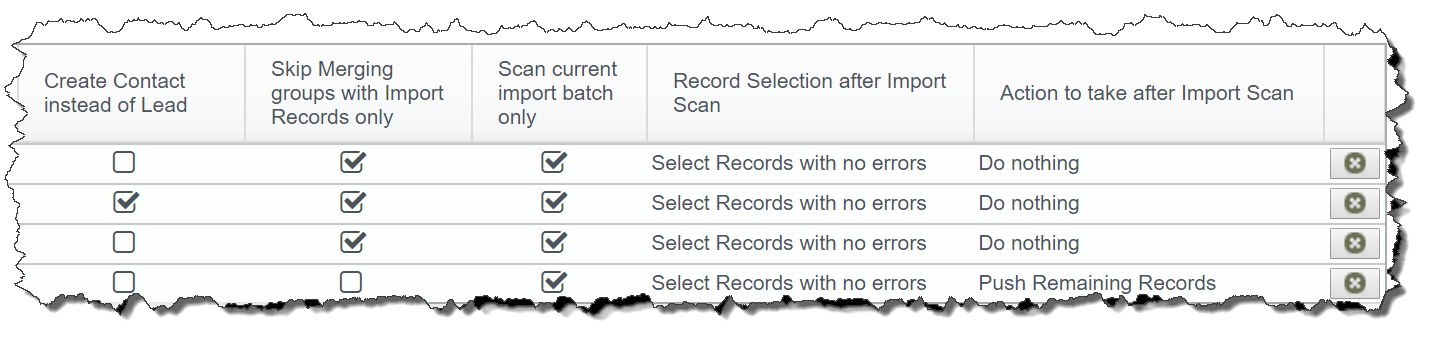
Skip Merging Groups with import Records only
Choose the selection that yous would typically choose during Pace 5 for each scan/rescan iteration you are configuring.
Browse Electric current Import Batch Only
Choose the option that you would typically choose during Step 5 for each scan/rescan iteration you are configuring.
Action to take afterward Import Browse
Choose the choice that fits the transmission process you would unremarkably accept afterwards performing your Browse/Rescan. Gear up this choice for each scan/rescan iteration you are configuring.
- Push Remaining Records – pushes all remaining records into Salesforce equally new records under the object you are scanning with the iteration y'all are configuring. This is a terminal step pick, and additional Rescan options cannot be configured when this option is chosen.
- Delete Remaining Import Records – deletes all remaining records not already managed from your file upload. This is a final step option, and additional Rescan options cannot be configured when this pick is chosen.
- Delete Import Records with Salesforce Duplicates – deletes whatever record that has detected a indistinguishable in Salesforce from the file upload. All other records (including Unique and records that incorporate Import File Just duplicates) volition remain in the file upload. Additional Rescan options tin can be configured when this option is chosen.
- Do Zilch – does not push or delete records from the file upload. It simply allows y'all to practice some other Rescan configuration without taking any action between scans. This volition likely exist the nigh common setting until all of your scan iterations are complete.
Example
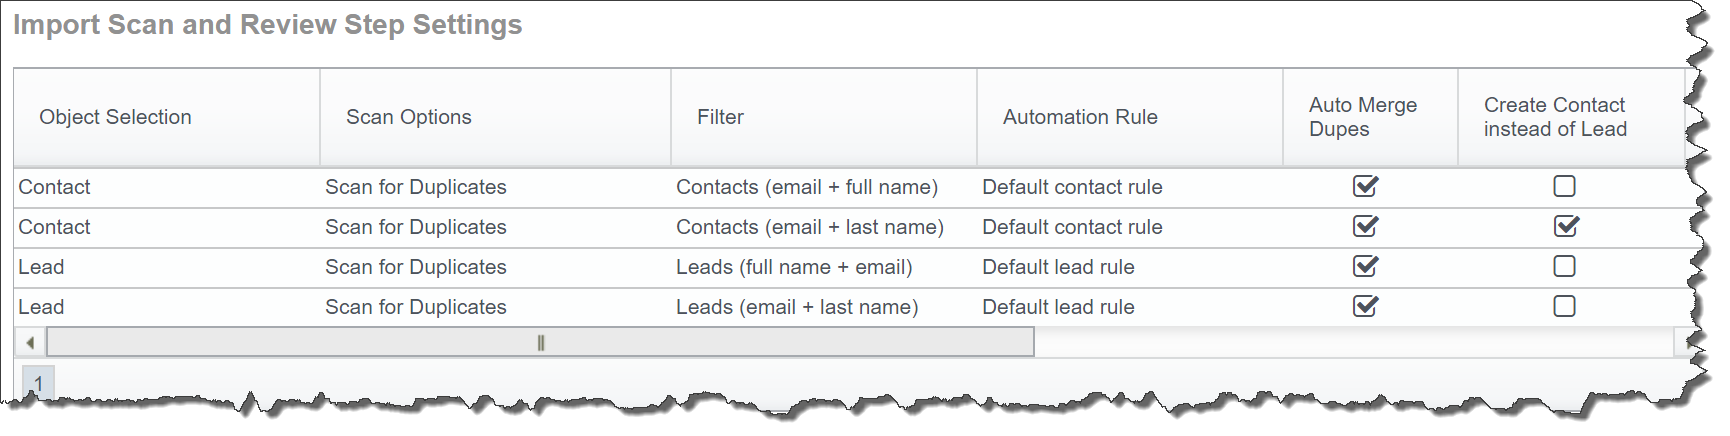
In this case, the import automation will run through the following:
- Start Scan will be against the Contact object using the 'Contacts (email + full name)' filter & 'Default contact rule'. It will automatically merge with detected Salesforce duplicates, but it volition not push whatever remaining records. Records duplicated within the import file only (not in Salesforce) will non be merged & pushed into Salesforce. The duplicate browse will ignore any other files uploaded to Cloudingo and merely evaluate the records inside the specific import batch and Salesforce.
- Second Browse volition exist against the Contact object again, this time using the 'Contacts (email + concluding proper noun)' filter & 'Default contact rule'. It volition automatically merge with detected Salesforce duplicates. It volition too button any records that have a matching Business relationship every bit new Contacts (instead of Leads) underneath those existing Accounts. Records duplicated within the import file merely (not in Salesforce) will non be merged and pushed to Salesforce. The duplicate scan will ignore any other files uploaded to Cloudingo and only evaluate the records within the specific import batch and Salesforce.
- Tertiary Browse will be against the Pb object using the 'Lead (full name + email)' filter & 'Default lead dominion'. It will automatically merge with detected Salesforce duplicates, merely information technology will non button whatsoever remaining records. Records duplicated within the import file only (non in Salesforce) volition not be merged and pushed to Salesforce. The duplicate browse will ignore any other files uploaded to Cloudingo and only evaluate the records within the specific import batch and Salesforce.
- Fourth Scan will exist confronting the Lead object again, this time using the 'Leads (email + last proper name)' filter & 'Default lead dominion'. It will automatically merge with detected Salesforce duplicates. It will also button any remaining records that accept not already been managed in a previous browse into Salesforce as new Leads. Information technology will merge and push any import file only duplicates that have been detected (that do not already exist in Salesforce). The duplicate scan will ignore any other files uploaded to Cloudingo and only evaluate the records within the specific import batch and Salesforce.
Note
This terminal iteration example pushes in all remaining records due to the 'Activity to have afterward Import Scan' setting ('Button Remaining Records'). This volition push ALL remaining records (including unique records as well as import file duplicates if you do not deselect the 'Skip Merging Groups with Import Records only' selection which forces the import file duplicates to merge and push to Salesforce).
Choosing 'Automobile Push Unique Records' will push but unique records. If you lot want to review import file duplicates without auto-merging them, choose 'Auto Button Unique Records', keep the choice 'Skip Merging Groups with Import Records Only' selected, and choose 'Practice Nada' for the 'Activeness to take after Import Scan'. This will exit import file duplicates for you to review manually after the import automation completes.
Click Salveto save your Import Template.
Editing, Copying, or Deleting
To edit, copy or delete an existing Import Template, navigate to your Import Template Library and click the menu option to the left of the template you wish to edit, re-create, or delete.
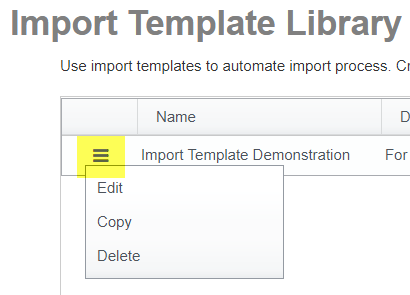
Edit volition permit you to alter your default options inside the template, update the campaigns fastened, mappings, etc.
Copy will allow yous to copy the existing template into a new template. Be certain to give your new template a unique proper noun and make any adjustments to settings equally necessary.
Delete volition delete the import template entirely. Any files pending import automation using the template will not be able to procedure if the associated template is deleted.
Automating Imports
To automate your import using an Import Template, navigate to the Import Dashboard and choose 'Automated Import'
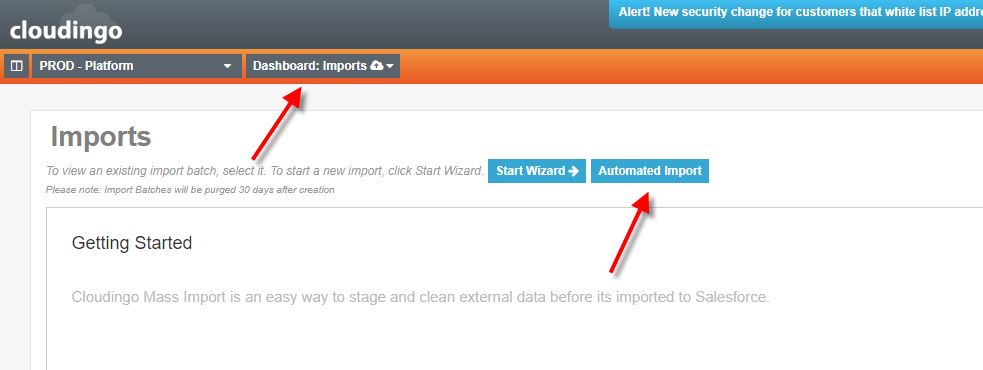
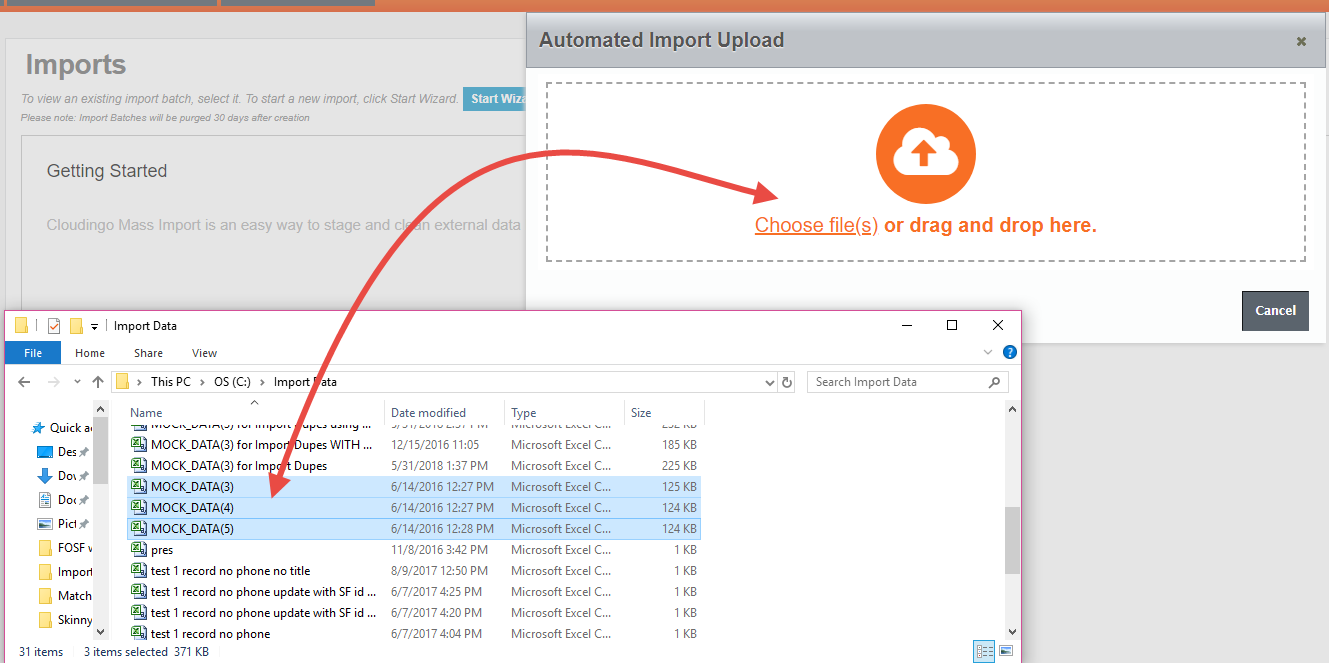
Once in the Automated Import Upload folio, click 'Choose file(s)' to browse and pull in your file(s), or locate your file(s), and drag/driblet them into the Upload box. Files cannot exceed 10MB in size (each). Import jobs volition be processed in the order that they announced in the Automated Import Upload box. Elevate/drop them in the order they should be executed.
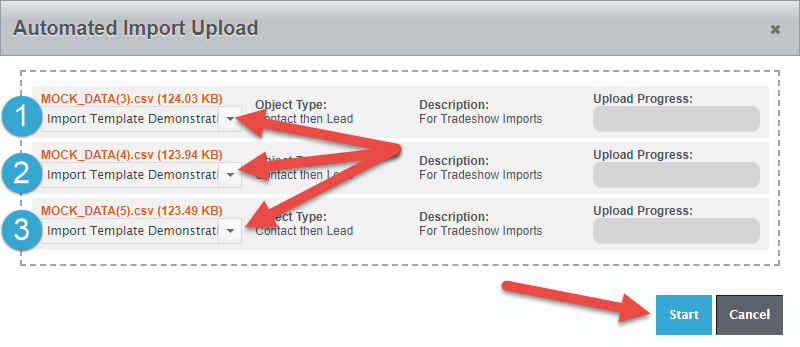
Once all files are added to the upload in the order that yous want to procedure them, click the drib box under each file and cull which Import Template you lot wish to utilize. When the correct templates are selected, you are set up to begin the import automation task.
Click Commencementto begin the upload process. The file upload(s) will be created in the import wizard and volition outset the automation job processing, using the rules defined within the template selected for the job.
Check Import Status & Errors
Cheque the import file status after the automation jobs are completed on the Import Dashboard.
If the status shows 'Completed', the import was successful and all records take been managed. If the condition shows 'Incomplete', click 'View' to drill into the import to fix any errors and cease the import process. Yous may exist required to gear up those errors before the automation chore can be restarted.
Video
Video: Rapid Import Overview
trevinosuntly1956.blogspot.com
Source: https://help.cloudingo.com/v1/docs/en/import-templates
0 Response to "Sfdc Cant See Delete Option for File Uploaded by Another User"
Post a Comment